Connect with me
How to install JDK on Windows 11
If you want a manual and flexible way to set up Java, learning how to install JDK on Windows 11 using the ZIP file from jdk.java.net is a great option. This method does not require an installer and works well when you do not have administrator access.
In this guide, you will learn how to download, extract, and configure JDK on Windows using the official OpenJDK ZIP package.
The website java.jdk.net is the official source for OpenJDK builds provided by Oracle. It offers:
- Free OpenJDK downloads
- ZIP packages for manual installation
- Latest stable and early access versions
Using java.jdk.net ensures you get a safe and trusted JDK distribution. Now let’s get started to know how to install jdk on Windows 11.
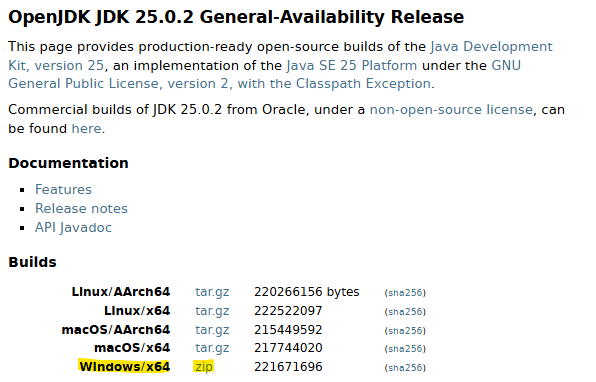
Step 1: Download JDK ZIP for Windows 11
To start installing JDK using ZIP, follow these steps:
- Open your browser
- Go to: https://jdk.java.net
- Select the JDK version you want (for example, JDK 25)
- Scroll to the Windows section
- Download the Windows x64 ZIP file
Step 2: Extract the ZIP File
After downloading the JDK ZIP file:
- Go to the download folder
- Right-click the ZIP file
- Click Extract All
- Choose a location such as:
- C:\Java\
- After extraction, you will see a folder like:
- C:\Java\jdk-25
This folder is your JDK installation directory.
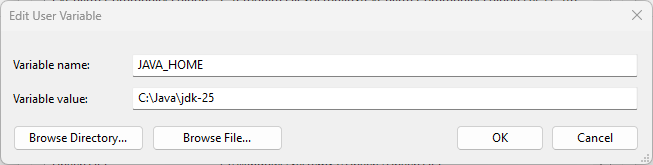
Step 3: Set JAVA_HOME for JDK Installation
When you install JDK using a ZIP file, you must manually configure environment variables.
- Search for Environment Variables in Windows
- Open Edit the system environment variables
- Click Environment Variables
- Under System variables, click New
- Enter:
- Variable Name: JAVA_HOME
- Variable Value: JDK folder path
- Click OK
- Enter:
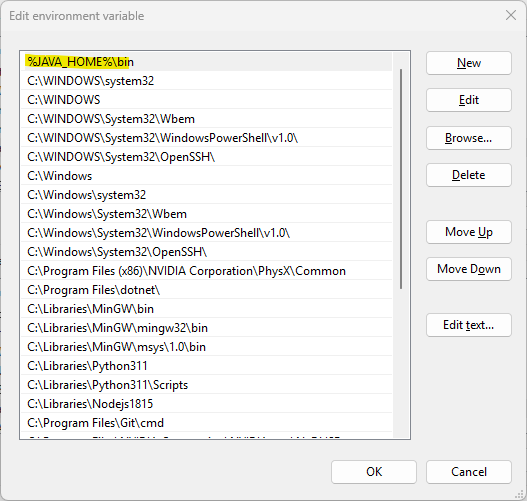
Step 4: Add JDK bin to PATH
To run Java commands from any directory:
- In System variables, select Path
- Click Edit
- Click New
- Add:
- %JAVA_HOME%\bin
- Click OK on all windows.
Step 5: Verify JDK Installation on Windows
Now verify that JDK is installed correctly.
- Open Command Prompt
- Run:
- java -version
- Also Run:
- javac -version
Note: If your terminal/command prompt is already running, make sure to close it and run again.

If both commands work, the JDK installation using ZIP is successful.
Common Errors When Installing JDK Using ZIP
Error: java is not recognized as an internal or external command
This usually means:
- JAVA_HOME is not set correctly
- PATH does not include
%JAVA_HOME%\bin - Command Prompt was not restarted
Fix:
- Recheck environment variables
- Restart Command Prompt
- Ensure there are no extra spaces in paths
Now you know how to install JDK on Windows 11.
Also, read the new Java features in Java 25.
Subscribe to my newsletter today!